Even though Windows Operating Systems offer a greater level of flexibility and user-friendliness to their users as compared to any other operating system, yet one can experience a number of problems due to this very flexibility.
From slower programs to malware that just won’t go away, to settings that get messed up during an experiment. Regardless of the kind of issue you might be facing now, the quickest way to get that fixed is by restoring your PC.
System Restore in Windows aids in boosting the speed of your computer. It can remove unwanted programs and malware from your PC. A system restore takes your PC to an earlier time period, that can be a day before, or a month before restoring your PC; so, any point of time that you will select it will remove any activity that you have made till the time period of your choice. Here is a step-by-step guide to restoring your PC.
1) Set Up a Good Back Up
You can back up your Windows PC as follows:
- Select the home button, then proceed to Control Panel, select System and Maintenance, and then Backup and Restore. Or you can do as follow:
- Set up backup and follow steps in the wizard. This is particularly relevant for people who have never used Windows Backup before, or have recently upgraded Windows Version.
- You can even select Back up now if you have set up a backup before, or wait for the backup to occur as per schedule.
2) Enable System Restore
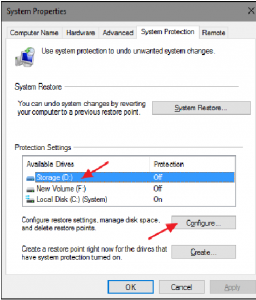
In case your system does not have system restore turned on by default, you can enable it by hitting the start button. By searching ‘restore’ on it, the option to ‘Create a restore point’ will come up. Click on that option to open a dialog box that will show you all the options to restore your system.
Select the ‘System Protection’ tab in the’ Protection Settings’ that will show you the list of drives in your PC that has protection enabled in them. Select the drive and click on ‘configure’ to easily turn on the protection. (Let’s take C: drive as an example in our guide).
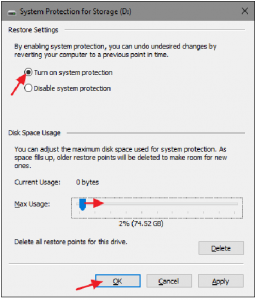
Also, click on the ‘Turn on system protection’ option in ‘System Protection’ dialog, and make sure to change the ‘Max Usage’ slider to the space of your hard drive, and then click ‘OK’.
3) Steps to Restore Your System to an Earlier Point
In case of any unfortunate event that makes your PC act all crazy, you really don’t need to worry about getting it fixed by an expert because you always have a choice to restore it.
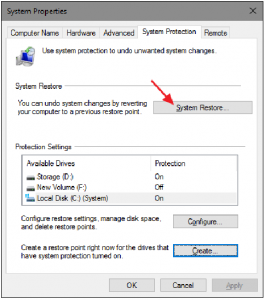
Once you have set your restore point, start again from ‘System Protection’ tab and click on the ‘System Restore’ button.
Click ‘Next’ on the convenient System Restore wizard that will give you a concise description of the whole process.
The next page will show you the default restore points and any restore points that you might have set up manually. So, select, ‘Show more restore points’ options to see restore points that were created from your recent activity.
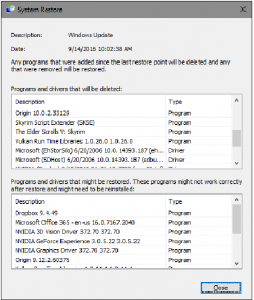
Ideally, you should choose the restore point from your recent working, but that’s up to you to decide, then you should click ‘Scan for relevant programs’ to know what programs will get uninstalled in the system restore process.
During the process of restoring your system, you will come across two types of programs. The programs and drivers at the top are the ones that will be deleted after you restore your windows, and the ones at the bottom are the ones that will get restored during the process. Yet again there are some drivers and programs that’ll need to be reinstalled even after being restored in order to function properly.
After that, select the restore point that you want to go with and click on ‘Next’. Even though you can cut it short by clicking ‘Next’ but it’s better to have a look at the programs that will get affected in the process.
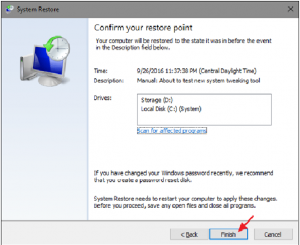
After that, you’ll be asked for a confirmation. Just make sure that you have selected the right restore point, and you are good to go. Go ahead and click on ‘Finish’.
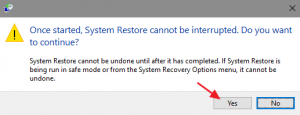
After you have selected ‘Finish’, another window will pop up stating that once you start the restoring process you will not be able to interrupt it, make sure to click ‘Yes’ on that. Otherwise, you’ll have to begin from the very start.
Once you have initiated the restore process, your PC will start the process by restarting itself. It might take some time for System Restore to reinstate all your files, so it is highly recommended to plan your work accordingly – keep a margin of at least 15 minutes for the process.
After your PC comes back to life then you can start your work from the restore point you had selected for yourself. Make sure to test if all your problems are resolved after the restoring process, and if they are not, then the System Restore creates a restore point right before initiating the restoring process. This default feature can turn out to be quite useful in a way that if your problems are not solved even after restoring your PC, then you can always go back by following the same steps and selecting the new restore point this time.
System Restore allows users to revert their computer’s state to the point in time that they chose to go. This allows the users to overcome any malfunction and problem that the user was unable to solve through antivirus software or so. Indeed there are other ways for users to get their problems fixed, from System File Checker to scan and fix corrupt files, and software to detect specific malware and eradicate them. However, System Restore can fix a significant number of problems, and this simple measure is better to use before moving to more advanced tools to solve your issue.

